> ## Documentation Index
> Fetch the complete documentation index at: https://docs.qoder.com/llms.txt
> Use this file to discover all available pages before exploring further.
# Conversations
> Interact with Wakers on the Chat page: select the executor and working directory, send tasks, view execution progress and results, use group collaboration, and manage conversation history.
This chapter explains how to select a Waker and working context, send tasks, and review results.
## Chat Page Overview
**Entry point:** Left navigation → "Chat", or Waker management card → "Create Conversation Task".
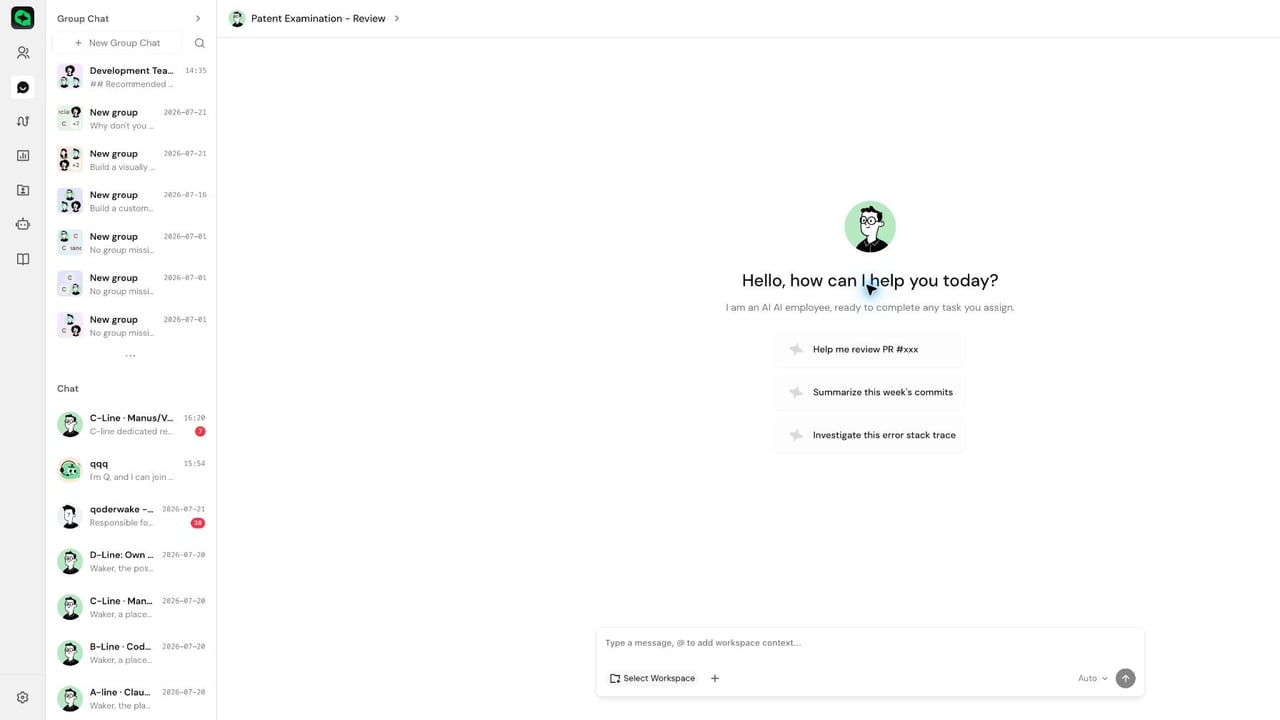 | Area | Function | Key checks |
| ------------ | ----------------------------------------------------------------------------------------------- | ----------------------------------------------------------------- |
| Left panel | Select a group, Waker, or history session | Is the executor correct? |
| Top bar | Shows the current Waker and task entry points | Is the current executor correct? |
| Message area | Displays user messages, Waker replies, execution process, and interaction cards | Are there pending authorizations or questions? |
| Input area | Enter tasks, select a working directory, add files or images, reference context, select a model | Do the directory, attachments, and model match task requirements? |
**Completion check:** After selecting a Waker, the main area shows its avatar, description, or recommended questions, and the input area allows you to select a working directory and enter messages.
## Starting a Single-Waker Conversation
1. Click "Create Conversation Task" from a Waker card, or enter "Chat" and select the target Waker.
2. Select a working directory and add attachments or `@` context as needed.
3. Enter the task and select a model in the lower-right corner of the input area. If unsure, use "Auto". Available models depend on your current account and environment.
4. Verify the Waker, working directory, attachments, and model before sending. Start a new conversation when the task or directory changes significantly.
When the input method is not in candidate selection mode, press `Enter` to send. When a Chinese IME is selecting candidates, `Enter` only confirms the candidate word. Use `Shift+Enter` for a new line.
**Completion check:** The user message appears in the session and the Waker shows a processing status. After the task completes, a reply or artifact entry appears.
## Writing Clear Task Requirements
A high-quality task typically includes a goal, scope, inputs, constraints, deliverables, and completion criteria. Recommended template:
```text theme={null}
Goal: What needs to be accomplished.
Scope: Which directories, files, and objects may be viewed or modified.
Inputs: Which attachments, logs, requirements, or knowledge bases to reference.
Constraints: What must not be changed, whether internet access, dependency installation, or command execution is allowed.
Deliverables: What format to return, whether code, tables, explanations, or verification results are needed.
Completion criteria: How to determine the task is done.
```
For complex tasks, first ask the Waker to read materials and confirm scope before executing. Put stable background information in projects, knowledge bases, or memory; put current requirements in the current message.
## Selecting a Working Directory or Project
1. Click "Select Working Directory" in the input area.
2. Choose a folder, project, or default working directory. For remote Wakers, select a workspace available on the remote device.
3. Check the name displayed in the input area. On first use, start with a read-only task to confirm the directory is correct.
**Completion check:** The input area shows the selected working directory; using `@` retrieves context from the current workspace; file information returned by the Waker matches the target directory.
Start a new conversation when switching workspaces. Do not select an overly large parent directory containing multiple sensitive projects.
## Adding Files, Images, and @ Context
| Method | How to add | Suitable content | Pre/post-send checks |
| ---------------------------- | ----------------------------------------------------------------------------------------- | --------------------------------------------------------------------------------- | ------------------------------------------------------------------------------------------------------------------------------------------ |
| Working directory or project | Select a folder, project, or default working directory in the input area | Repositories, documentation directories, long-term projects | Confirm the name and runtime environment before sending; run a read-only task on first use |
| File or image | Click "+" in the input area, or drag/paste supported files into the input area | Logs, screenshots, one-off requirement docs, external files | Confirm the attachment indicator before sending; after sending, confirm the message is visible and the reply references the actual content |
| `@` context | First select a working directory, then type `@` with a keyword and select the target item | Key files, configurations, directories, or other context in the current workspace | Confirm the reference indicator before sending; only include content relevant to the current question |
After adding attachments or references, describe their purpose, focus area, and expected output in your message. Avoid adding large amounts of unrelated content at once.
## Viewing Execution Progress and Results
### During execution
1. After sending, confirm the Waker has started processing and verify the directories, files, or external systems being operated on. When authorization, approval, or additional information is requested, first check the target and scope of impact. Stop immediately if the task deviates from the goal.
2. After stopping, check completed steps and file changes. If necessary, start a new conversation and resend.
Stopping a task does not undo external operations or file modifications that have already been completed.
### After task completion
Check whether the results achieve the goal, respect the scope, and provide verification. Open actual content to inspect files, code, documents, or images.
Continue the current session when supplementing the same goal, correcting results, or continuing verification. Start a new task when the goal, directory, or executor changes, or when you do not want old context to affect results.
## Using Group Collaboration
Groups are suitable for multiple specialist roles to discuss, review, or execute a shared goal together. The Leader understands requirements, organizes collaboration, and summarizes results; other members participate when consulted or assigned tasks. Tasks with a single responsibility are typically handled directly with a single Waker.
### Creating and Maintaining Groups
1. Click "New Group" on the left side of Chat, or go to "Waker Management" → "My Groups" → "New Group".
2. Enter an identifiable group name and select 2 to 8 Wakers.
3. Designate one Leader from the selected local Wakers. Remote Wakers can join but currently cannot serve as Leader.
4. Check member availability. When a member is unavailable or has no available working directory, follow on-screen prompts to resolve device, runtime, or workspace issues.
5. Click "Create" and confirm the new group appears in "My Groups" and the Chat left-side group list.
Group cards display members and current task status. The Chat left side supports searching, expanding groups, and viewing unread items. The "More Actions" option on an entry allows one-click mark as read, rename, or delete. Deleting only removes the group from the management list — existing tasks and messages are not cascade-deleted.
The group members page currently only supports adding local Wakers, not removing members or changing the Leader. To make these adjustments, recreate the group.
### Starting a Group Topic or Task
1. After creating a new group, send the first message directly from the input area. For existing topics, click "Conversation Task" at the top to start a new topic, or click "Create Conversation Task" from the group card.
2. Select a working directory and model in the input area; add files, images, or workspace context as needed.
3. Clearly state the shared goal, participating roles, scope, operational constraints, delivery format, and acceptance criteria.
4. When no member is specified, the message is sent to the Leader by default for clarification or goal formation. To direct attention to specific members, `@` one or more members. The system decides whether the Leader handles it centrally or initiates targeted consultation with specific members based on the task stage.
5. When a question card appears, provide additional information first. When a plan or proposal confirmation appears, verify the task breakdown, assigned members, and acceptance requirements before confirming. Regular consultations do not automatically enter formal execution just because a message was sent.
When multiple people use the same workspace, clearly define who can modify and who is only responsible for analysis or review to avoid members editing the same file simultaneously. When remote members participate, also confirm they have the correct project and dependencies on their device.
### Viewing Execution Progress and Results
| Entry point | Available actions |
| ------------------------------ | ---------------------------------------------------------------------------------------------------------------------------------------- |
| "Current Task" → "Group Tasks" | View overall progress, member assignments, and in-progress or completed status of each task |
| "Current Task" → "Artifacts" | View files and file changes produced by each member in the current topic, and open actual files for acceptance |
| "Current Task" → "Members" | Verify the Leader and group members; click "Add" to supplement local Wakers when needed |
| "Task List" | View and switch between the current group's historical topics, including consultations or discussions that have not entered formal tasks |
| "Conversation Task" | Create an independent topic to prevent new goals from being influenced by old task context |
After task completion, you can continue asking follow-up questions, provide acceptance feedback, or request minor adjustments in the same session. Start a new conversation task when the goal or working directory changes. To stop during execution, use the stop button in the input area — stopping does not undo file modifications or external operations that have already occurred.
**Completion check:** The Leader, members, and working directory in the group are correct; formal tasks display member assignments and progress; the final conclusion is summarized by the Leader; artifacts can be opened and pass actual content acceptance.
## Managing and Continuing Historical Tasks
View historical tasks from Chat, Waker details → "Conversation Tasks", or the top "Task List".
| Action | Method |
| ------ | -------------------------------------------------------------------------------------------------------------------------------------------------------------------------------- |
| Find | First confirm you are in the "Conversation Tasks" category, then filter by Waker, time, title, or page conditions. After opening, verify the first message and working directory |
| Rename | Open "More Actions" for the session and select "Rename". Recommended format: "project + task + date or phase" |
| Delete | Open "More Actions" and select "Delete"; read the prompt before confirming. Save any conclusions or artifacts you still need before deleting |
Deleting a session does not undo files or external system changes that have already been produced.
| Area | Function | Key checks |
| ------------ | ----------------------------------------------------------------------------------------------- | ----------------------------------------------------------------- |
| Left panel | Select a group, Waker, or history session | Is the executor correct? |
| Top bar | Shows the current Waker and task entry points | Is the current executor correct? |
| Message area | Displays user messages, Waker replies, execution process, and interaction cards | Are there pending authorizations or questions? |
| Input area | Enter tasks, select a working directory, add files or images, reference context, select a model | Do the directory, attachments, and model match task requirements? |
**Completion check:** After selecting a Waker, the main area shows its avatar, description, or recommended questions, and the input area allows you to select a working directory and enter messages.
## Starting a Single-Waker Conversation
1. Click "Create Conversation Task" from a Waker card, or enter "Chat" and select the target Waker.
2. Select a working directory and add attachments or `@` context as needed.
3. Enter the task and select a model in the lower-right corner of the input area. If unsure, use "Auto". Available models depend on your current account and environment.
4. Verify the Waker, working directory, attachments, and model before sending. Start a new conversation when the task or directory changes significantly.
When the input method is not in candidate selection mode, press `Enter` to send. When a Chinese IME is selecting candidates, `Enter` only confirms the candidate word. Use `Shift+Enter` for a new line.
**Completion check:** The user message appears in the session and the Waker shows a processing status. After the task completes, a reply or artifact entry appears.
## Writing Clear Task Requirements
A high-quality task typically includes a goal, scope, inputs, constraints, deliverables, and completion criteria. Recommended template:
```text theme={null}
Goal: What needs to be accomplished.
Scope: Which directories, files, and objects may be viewed or modified.
Inputs: Which attachments, logs, requirements, or knowledge bases to reference.
Constraints: What must not be changed, whether internet access, dependency installation, or command execution is allowed.
Deliverables: What format to return, whether code, tables, explanations, or verification results are needed.
Completion criteria: How to determine the task is done.
```
For complex tasks, first ask the Waker to read materials and confirm scope before executing. Put stable background information in projects, knowledge bases, or memory; put current requirements in the current message.
## Selecting a Working Directory or Project
1. Click "Select Working Directory" in the input area.
2. Choose a folder, project, or default working directory. For remote Wakers, select a workspace available on the remote device.
3. Check the name displayed in the input area. On first use, start with a read-only task to confirm the directory is correct.
**Completion check:** The input area shows the selected working directory; using `@` retrieves context from the current workspace; file information returned by the Waker matches the target directory.
Start a new conversation when switching workspaces. Do not select an overly large parent directory containing multiple sensitive projects.
## Adding Files, Images, and @ Context
| Method | How to add | Suitable content | Pre/post-send checks |
| ---------------------------- | ----------------------------------------------------------------------------------------- | --------------------------------------------------------------------------------- | ------------------------------------------------------------------------------------------------------------------------------------------ |
| Working directory or project | Select a folder, project, or default working directory in the input area | Repositories, documentation directories, long-term projects | Confirm the name and runtime environment before sending; run a read-only task on first use |
| File or image | Click "+" in the input area, or drag/paste supported files into the input area | Logs, screenshots, one-off requirement docs, external files | Confirm the attachment indicator before sending; after sending, confirm the message is visible and the reply references the actual content |
| `@` context | First select a working directory, then type `@` with a keyword and select the target item | Key files, configurations, directories, or other context in the current workspace | Confirm the reference indicator before sending; only include content relevant to the current question |
After adding attachments or references, describe their purpose, focus area, and expected output in your message. Avoid adding large amounts of unrelated content at once.
## Viewing Execution Progress and Results
### During execution
1. After sending, confirm the Waker has started processing and verify the directories, files, or external systems being operated on. When authorization, approval, or additional information is requested, first check the target and scope of impact. Stop immediately if the task deviates from the goal.
2. After stopping, check completed steps and file changes. If necessary, start a new conversation and resend.
Stopping a task does not undo external operations or file modifications that have already been completed.
### After task completion
Check whether the results achieve the goal, respect the scope, and provide verification. Open actual content to inspect files, code, documents, or images.
Continue the current session when supplementing the same goal, correcting results, or continuing verification. Start a new task when the goal, directory, or executor changes, or when you do not want old context to affect results.
## Using Group Collaboration
Groups are suitable for multiple specialist roles to discuss, review, or execute a shared goal together. The Leader understands requirements, organizes collaboration, and summarizes results; other members participate when consulted or assigned tasks. Tasks with a single responsibility are typically handled directly with a single Waker.
### Creating and Maintaining Groups
1. Click "New Group" on the left side of Chat, or go to "Waker Management" → "My Groups" → "New Group".
2. Enter an identifiable group name and select 2 to 8 Wakers.
3. Designate one Leader from the selected local Wakers. Remote Wakers can join but currently cannot serve as Leader.
4. Check member availability. When a member is unavailable or has no available working directory, follow on-screen prompts to resolve device, runtime, or workspace issues.
5. Click "Create" and confirm the new group appears in "My Groups" and the Chat left-side group list.
Group cards display members and current task status. The Chat left side supports searching, expanding groups, and viewing unread items. The "More Actions" option on an entry allows one-click mark as read, rename, or delete. Deleting only removes the group from the management list — existing tasks and messages are not cascade-deleted.
The group members page currently only supports adding local Wakers, not removing members or changing the Leader. To make these adjustments, recreate the group.
### Starting a Group Topic or Task
1. After creating a new group, send the first message directly from the input area. For existing topics, click "Conversation Task" at the top to start a new topic, or click "Create Conversation Task" from the group card.
2. Select a working directory and model in the input area; add files, images, or workspace context as needed.
3. Clearly state the shared goal, participating roles, scope, operational constraints, delivery format, and acceptance criteria.
4. When no member is specified, the message is sent to the Leader by default for clarification or goal formation. To direct attention to specific members, `@` one or more members. The system decides whether the Leader handles it centrally or initiates targeted consultation with specific members based on the task stage.
5. When a question card appears, provide additional information first. When a plan or proposal confirmation appears, verify the task breakdown, assigned members, and acceptance requirements before confirming. Regular consultations do not automatically enter formal execution just because a message was sent.
When multiple people use the same workspace, clearly define who can modify and who is only responsible for analysis or review to avoid members editing the same file simultaneously. When remote members participate, also confirm they have the correct project and dependencies on their device.
### Viewing Execution Progress and Results
| Entry point | Available actions |
| ------------------------------ | ---------------------------------------------------------------------------------------------------------------------------------------- |
| "Current Task" → "Group Tasks" | View overall progress, member assignments, and in-progress or completed status of each task |
| "Current Task" → "Artifacts" | View files and file changes produced by each member in the current topic, and open actual files for acceptance |
| "Current Task" → "Members" | Verify the Leader and group members; click "Add" to supplement local Wakers when needed |
| "Task List" | View and switch between the current group's historical topics, including consultations or discussions that have not entered formal tasks |
| "Conversation Task" | Create an independent topic to prevent new goals from being influenced by old task context |
After task completion, you can continue asking follow-up questions, provide acceptance feedback, or request minor adjustments in the same session. Start a new conversation task when the goal or working directory changes. To stop during execution, use the stop button in the input area — stopping does not undo file modifications or external operations that have already occurred.
**Completion check:** The Leader, members, and working directory in the group are correct; formal tasks display member assignments and progress; the final conclusion is summarized by the Leader; artifacts can be opened and pass actual content acceptance.
## Managing and Continuing Historical Tasks
View historical tasks from Chat, Waker details → "Conversation Tasks", or the top "Task List".
| Action | Method |
| ------ | -------------------------------------------------------------------------------------------------------------------------------------------------------------------------------- |
| Find | First confirm you are in the "Conversation Tasks" category, then filter by Waker, time, title, or page conditions. After opening, verify the first message and working directory |
| Rename | Open "More Actions" for the session and select "Rename". Recommended format: "project + task + date or phase" |
| Delete | Open "More Actions" and select "Delete"; read the prompt before confirming. Save any conclusions or artifacts you still need before deleting |
Deleting a session does not undo files or external system changes that have already been produced.