> ## Documentation Index
> Fetch the complete documentation index at: https://docs.qoder.com/llms.txt
> Use this file to discover all available pages before exploring further.
# SSO
> This guide explains how to configure Single Sign-On (SSO) for your organization using SAML 2.0 or OIDC.
Applicable plans: Teams, Enterprise
## **Overview**
Single Sign-On (SSO) allows members of your organization to authenticate using their corporate Identity Provider (IDP) without managing separate login credentials in Qoder. Qoder supports the two most widely adopted SSO protocols:
* **SAML 2.0** — A mature, XML-based enterprise authentication standard used by Okta, Microsoft Entra ID (Azure AD), OneLogin, Alibaba Cloud IDaaS, and more.
* **OIDC (OpenID Connect)** — A modern identity layer built on top of OAuth 2.0 that supports one-click configuration via a Discovery URL. Typical providers include Okta, Azure AD, Google Workspace, Auth0, Authing, and Alibaba Cloud RAM.
### **Advantages of SSO**
* **Enhanced Security:** Centralize authentication through your corporate Identity Provider.
* **Improved User Experience:** A single set of credentials provides access to all corporate applications.
* **Simplified User Management:** Users on verified email domains are automatically provisioned and added to the organization on first login.
### Which protocol should I choose?
| Protocol | When to use |
| -------- | --------------------------------------------------------------------------------------------------------------------------------------- |
| **SAML** | Your IDP only supports SAML; you need IdP-initiated SSO; you already run a SAML-based authentication stack. |
| **OIDC** | Your IDP exposes OIDC / OAuth 2.0 endpoints; you want one-click setup via a Discovery URL; you prefer a lighter JSON-based integration. |
Only one SSO protocol can be active per organization at a time. To switch protocols, deactivate the current one before creating a new configuration.
## **Prerequisites**
Before configuring SSO, please ensure you meet the following requirements:
* **Admin Permissions:** You must have administrative permissions within your organization.
* **Identity Provider Permissions:** You must have permission to configure applications within your organization's Identity Provider (IDP).
* **DNS Access Permissions:** You must have permission to add a TXT record to your organization's email domain for verification purposes.
 ## **Configuration Process**
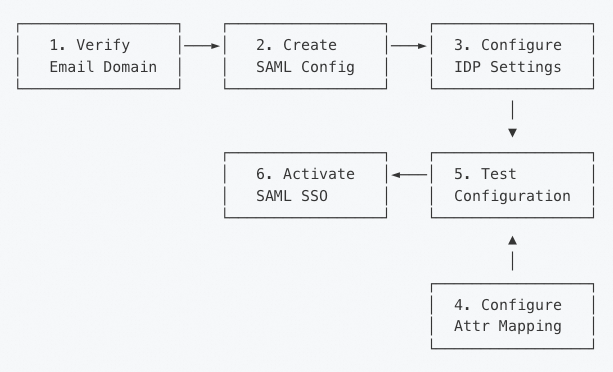
The SSO configuration process consists of the following steps, regardless of whether you choose SAML or OIDC:
## **Configuration Process**
The SSO configuration process consists of the following steps, regardless of whether you choose SAML or OIDC:
 ### **Step 1: Verify Email Domain**
Before configuring SSO, you must first verify ownership of your company's email domain to ensure that only users with an email address from a verified domain can log in through your organization's SSO.
For configuration instructions, see [**Domain Verification**](https://docs.qoder.com/account/teams/domains).
### **Step 2: Create SSO Configuration**
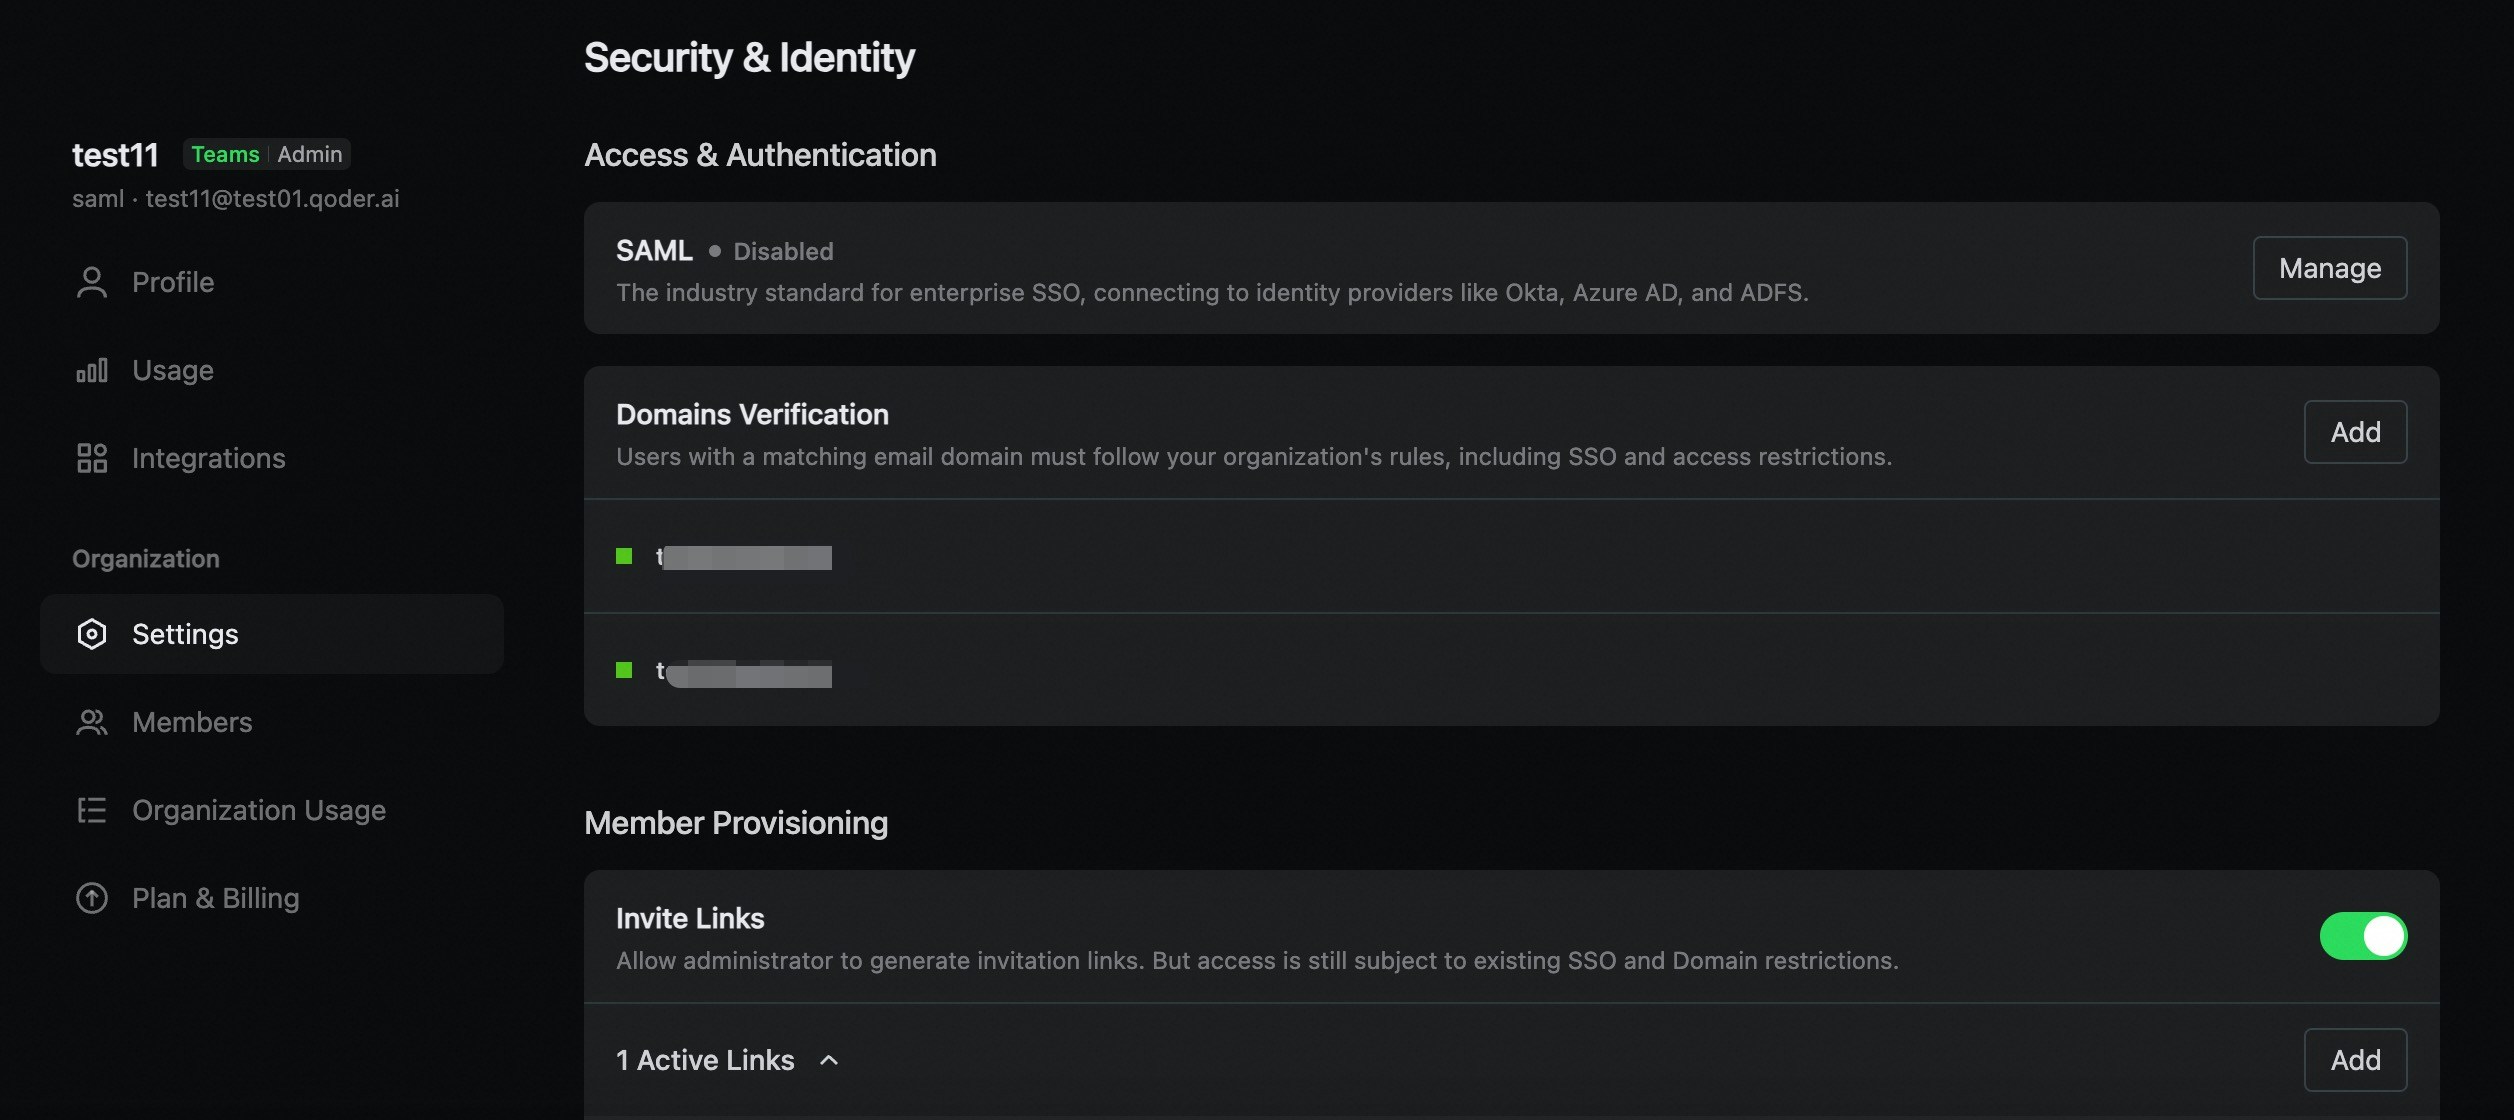
1. Administrators navigate to **Organization Settings > Security & Identity**.
2. Choose **SAML Configuration** or **OIDC Configuration** depending on your IDP.
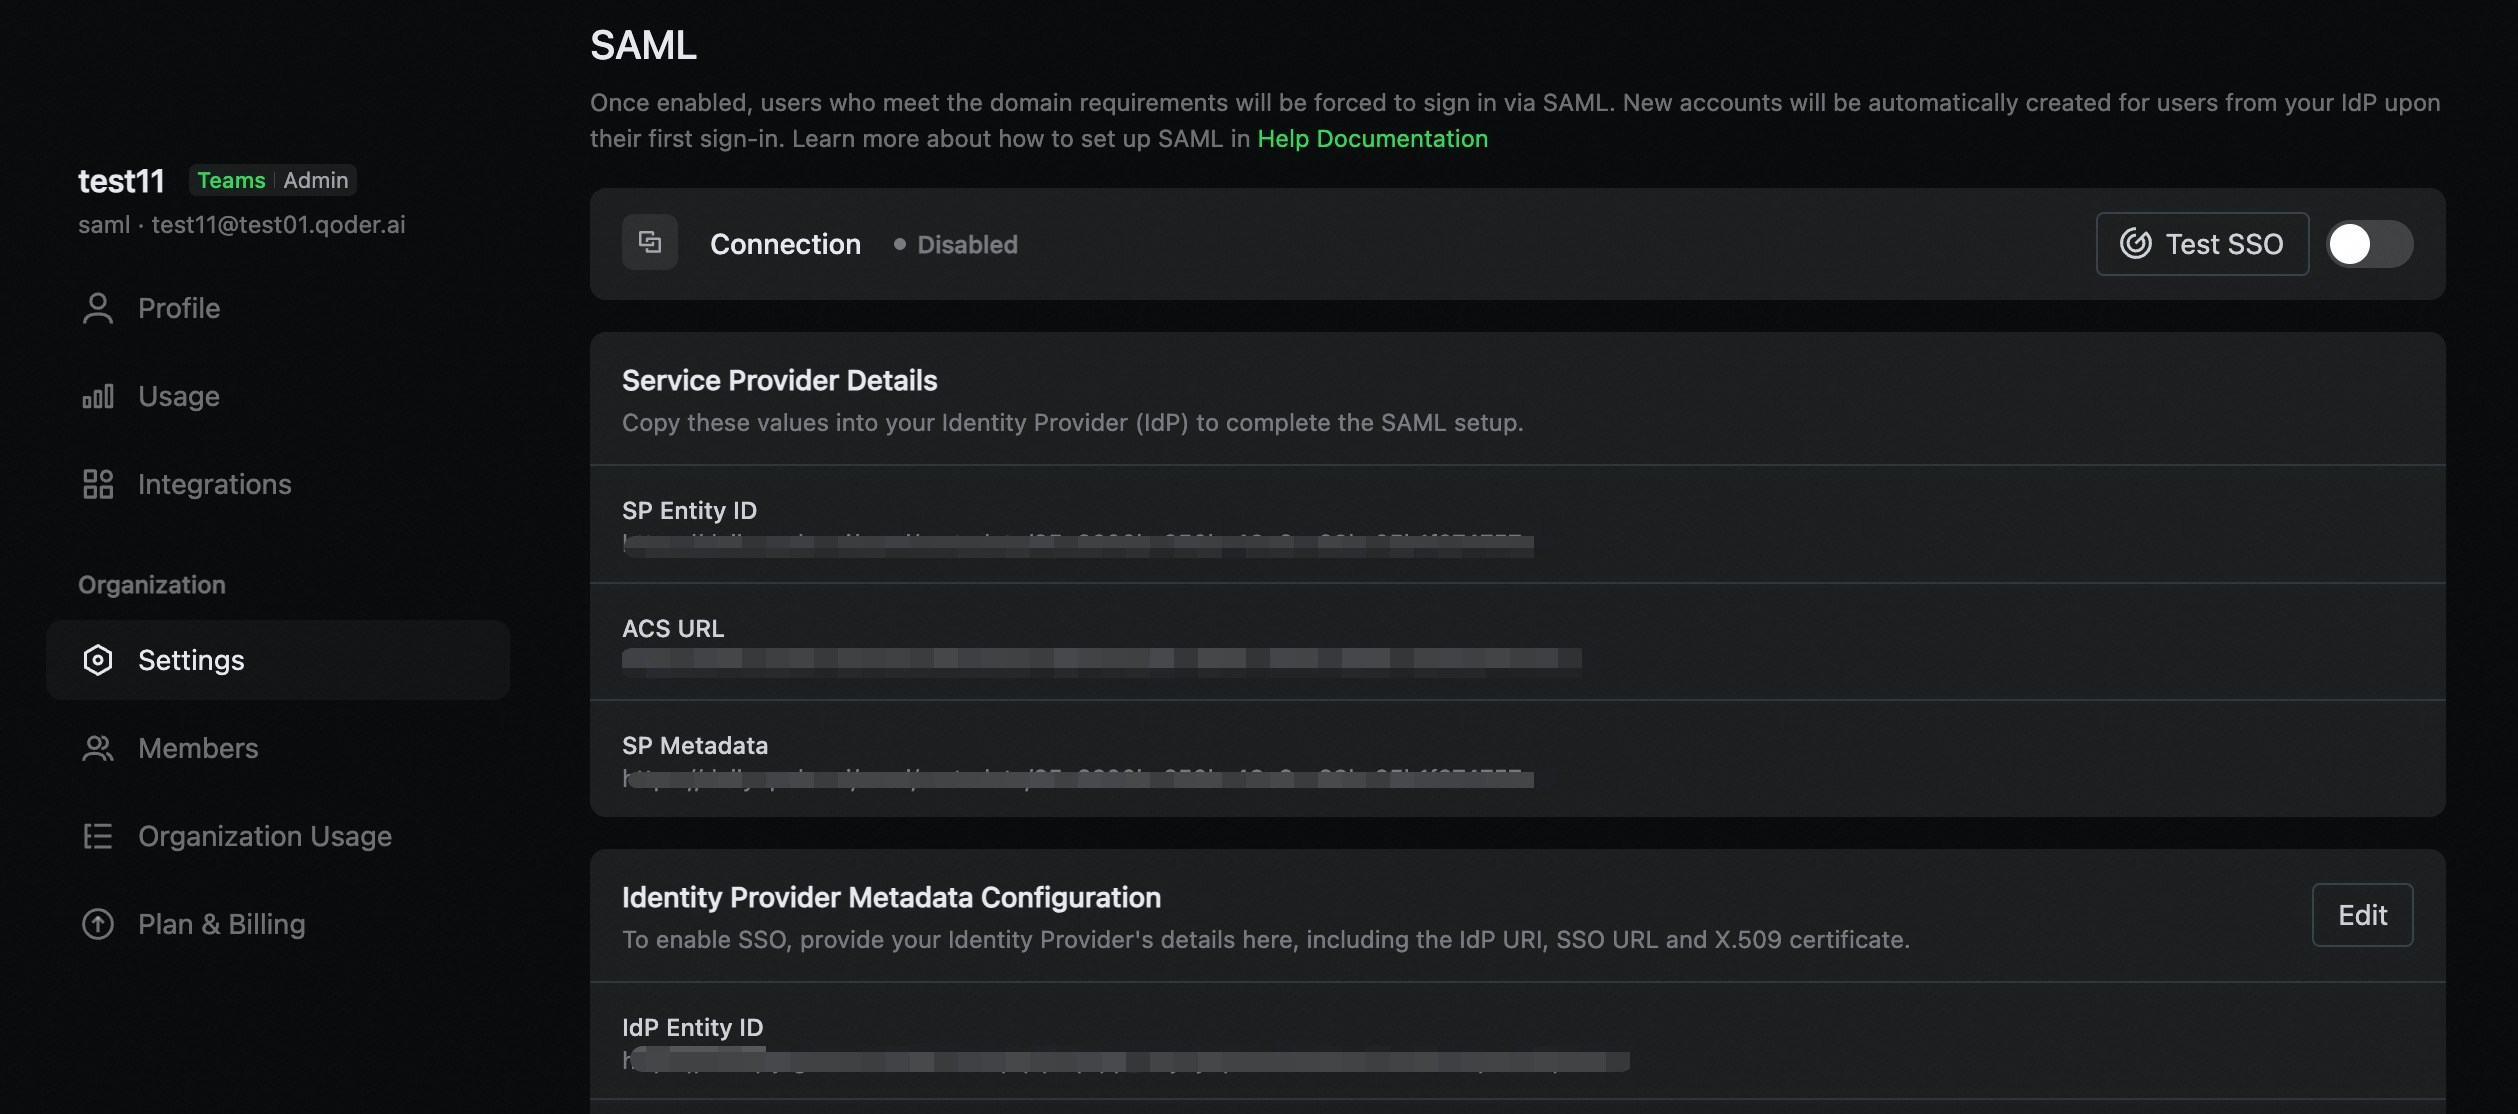
Create the SAML configuration for your organization. The system will automatically generate the SP certificates and private keys.
After initialization, Qoder will automatically generate the following information for you. You will need this information for the subsequent configuration of your Identity Provider (IDP):
* SP Entity ID
* SP Metadata URL
* SP ACS (Assertion Consumer Service) URL
* SP certificates and private keys
**Example SP Information Generated:**
| **Field** | **Example Value** |
| :-------------- | ---------------------------------------------- |
| SP Entity ID | `https://qoder.com/saml/metadata/{org_id}` |
| SP Metadata URL | `https://qoder.com/saml/metadata/{org_id}` |
| SP ACS URL | `https://qoder.com/sso/callback/saml/{org_id}` |
### **Step 1: Verify Email Domain**
Before configuring SSO, you must first verify ownership of your company's email domain to ensure that only users with an email address from a verified domain can log in through your organization's SSO.
For configuration instructions, see [**Domain Verification**](https://docs.qoder.com/account/teams/domains).
### **Step 2: Create SSO Configuration**
1. Administrators navigate to **Organization Settings > Security & Identity**.
2. Choose **SAML Configuration** or **OIDC Configuration** depending on your IDP.
Create the SAML configuration for your organization. The system will automatically generate the SP certificates and private keys.
After initialization, Qoder will automatically generate the following information for you. You will need this information for the subsequent configuration of your Identity Provider (IDP):
* SP Entity ID
* SP Metadata URL
* SP ACS (Assertion Consumer Service) URL
* SP certificates and private keys
**Example SP Information Generated:**
| **Field** | **Example Value** |
| :-------------- | ---------------------------------------------- |
| SP Entity ID | `https://qoder.com/saml/metadata/{org_id}` |
| SP Metadata URL | `https://qoder.com/saml/metadata/{org_id}` |
| SP ACS URL | `https://qoder.com/sso/callback/saml/{org_id}` |
 Create the OIDC configuration for your organization. The system will automatically generate the Redirect URI and the SSO login URL, which you will need when registering an OAuth 2.0 / OIDC application on the IDP side.
**Example SP Information Generated:**
| **Field** | **Example Value** |
| :---------------------- | ---------------------------------------------- |
| Redirect URI (Callback) | `https://qoder.com/sso/callback/oidc/{org_id}` |
| Login URL | `https://qoder.com/sso/login/oidc/{org_id}` |
Open your IDP console and create an OAuth 2.0 / OIDC application. Add the **Redirect URI** above to the application's list of allowed redirect URIs. Once the application is created, the IDP will issue a **Client ID** and **Client Secret**, which you will use in Step 3.
### **Step 3: Configure Identity Provider (IDP)**
You can configure the SAML IDP using one of two methods:
#### **Method A: Automatic Configuration (Recommended)**
If your IDP provides a metadata URL, use this method for automatic configuration:
1. In the **SAML Configuration** page, locate the **Identity Provider Metadata Configuration** section.
2. Select the **Import from URL** configuration mode.
3. Enter your IDP Metadata URL (e.g., `https://your-idp.example.com/app/metadata`).
4. Click **Save**.
The system will automatically fetch and parse the following information:
* IDP Entity ID
* SSO URL
* Signing certificates
#### **Method B: Manual Configuration**
If your IDP doesn't provide a metadata URL, follow these steps to configure settings manually:
1. In the **SAML Configuration** page, select the **Manual Configuration** mode.
2. Fill in the following fields:
* **IDP Entity ID:** The entity identifier for your identity provider.
* **IDP SSO URL:** The SSO login endpoint URL.
* **IDP Public Certificate:** The signing certificate in PEM format (optional but recommended).
3. Click **Save**.
Create the OIDC configuration for your organization. The system will automatically generate the Redirect URI and the SSO login URL, which you will need when registering an OAuth 2.0 / OIDC application on the IDP side.
**Example SP Information Generated:**
| **Field** | **Example Value** |
| :---------------------- | ---------------------------------------------- |
| Redirect URI (Callback) | `https://qoder.com/sso/callback/oidc/{org_id}` |
| Login URL | `https://qoder.com/sso/login/oidc/{org_id}` |
Open your IDP console and create an OAuth 2.0 / OIDC application. Add the **Redirect URI** above to the application's list of allowed redirect URIs. Once the application is created, the IDP will issue a **Client ID** and **Client Secret**, which you will use in Step 3.
### **Step 3: Configure Identity Provider (IDP)**
You can configure the SAML IDP using one of two methods:
#### **Method A: Automatic Configuration (Recommended)**
If your IDP provides a metadata URL, use this method for automatic configuration:
1. In the **SAML Configuration** page, locate the **Identity Provider Metadata Configuration** section.
2. Select the **Import from URL** configuration mode.
3. Enter your IDP Metadata URL (e.g., `https://your-idp.example.com/app/metadata`).
4. Click **Save**.
The system will automatically fetch and parse the following information:
* IDP Entity ID
* SSO URL
* Signing certificates
#### **Method B: Manual Configuration**
If your IDP doesn't provide a metadata URL, follow these steps to configure settings manually:
1. In the **SAML Configuration** page, select the **Manual Configuration** mode.
2. Fill in the following fields:
* **IDP Entity ID:** The entity identifier for your identity provider.
* **IDP SSO URL:** The SSO login endpoint URL.
* **IDP Public Certificate:** The signing certificate in PEM format (optional but recommended).
3. Click **Save**.
 #### **Issuer URL Auto-Discovery**
If your IDP complies with the OpenID Connect Discovery specification (i.e., it exposes a `/.well-known/openid-configuration` endpoint), use this method:
1. In the **OIDC Configuration** page, select the **Issuer URL Auto-Discovery** configuration mode.
2. Fill in the following fields:
* **Issuer URL:** The issuer URL of your IDP (e.g., `https://login.company.com`, `https://oauth.aliyun.com`, `https://your-tenant.authing.cn/oidc`).
* **Client ID:** The client ID issued by your IDP for the Qoder application.
* **Client Secret:** The client secret issued by your IDP for the Qoder application.
* **Scopes** (optional): The OAuth scopes to request. `openid` is required and will be added automatically; `openid email profile` is recommended.
3. Click **Save**.
The system will automatically fetch and parse the following from `{Issuer URL}/.well-known/openid-configuration`:
* Authorization endpoint
* Token endpoint
* UserInfo endpoint
* JWKS URL (used to verify the ID Token signature)
* Supported signing algorithms
### **Step 4: Configure Attribute Mapping**
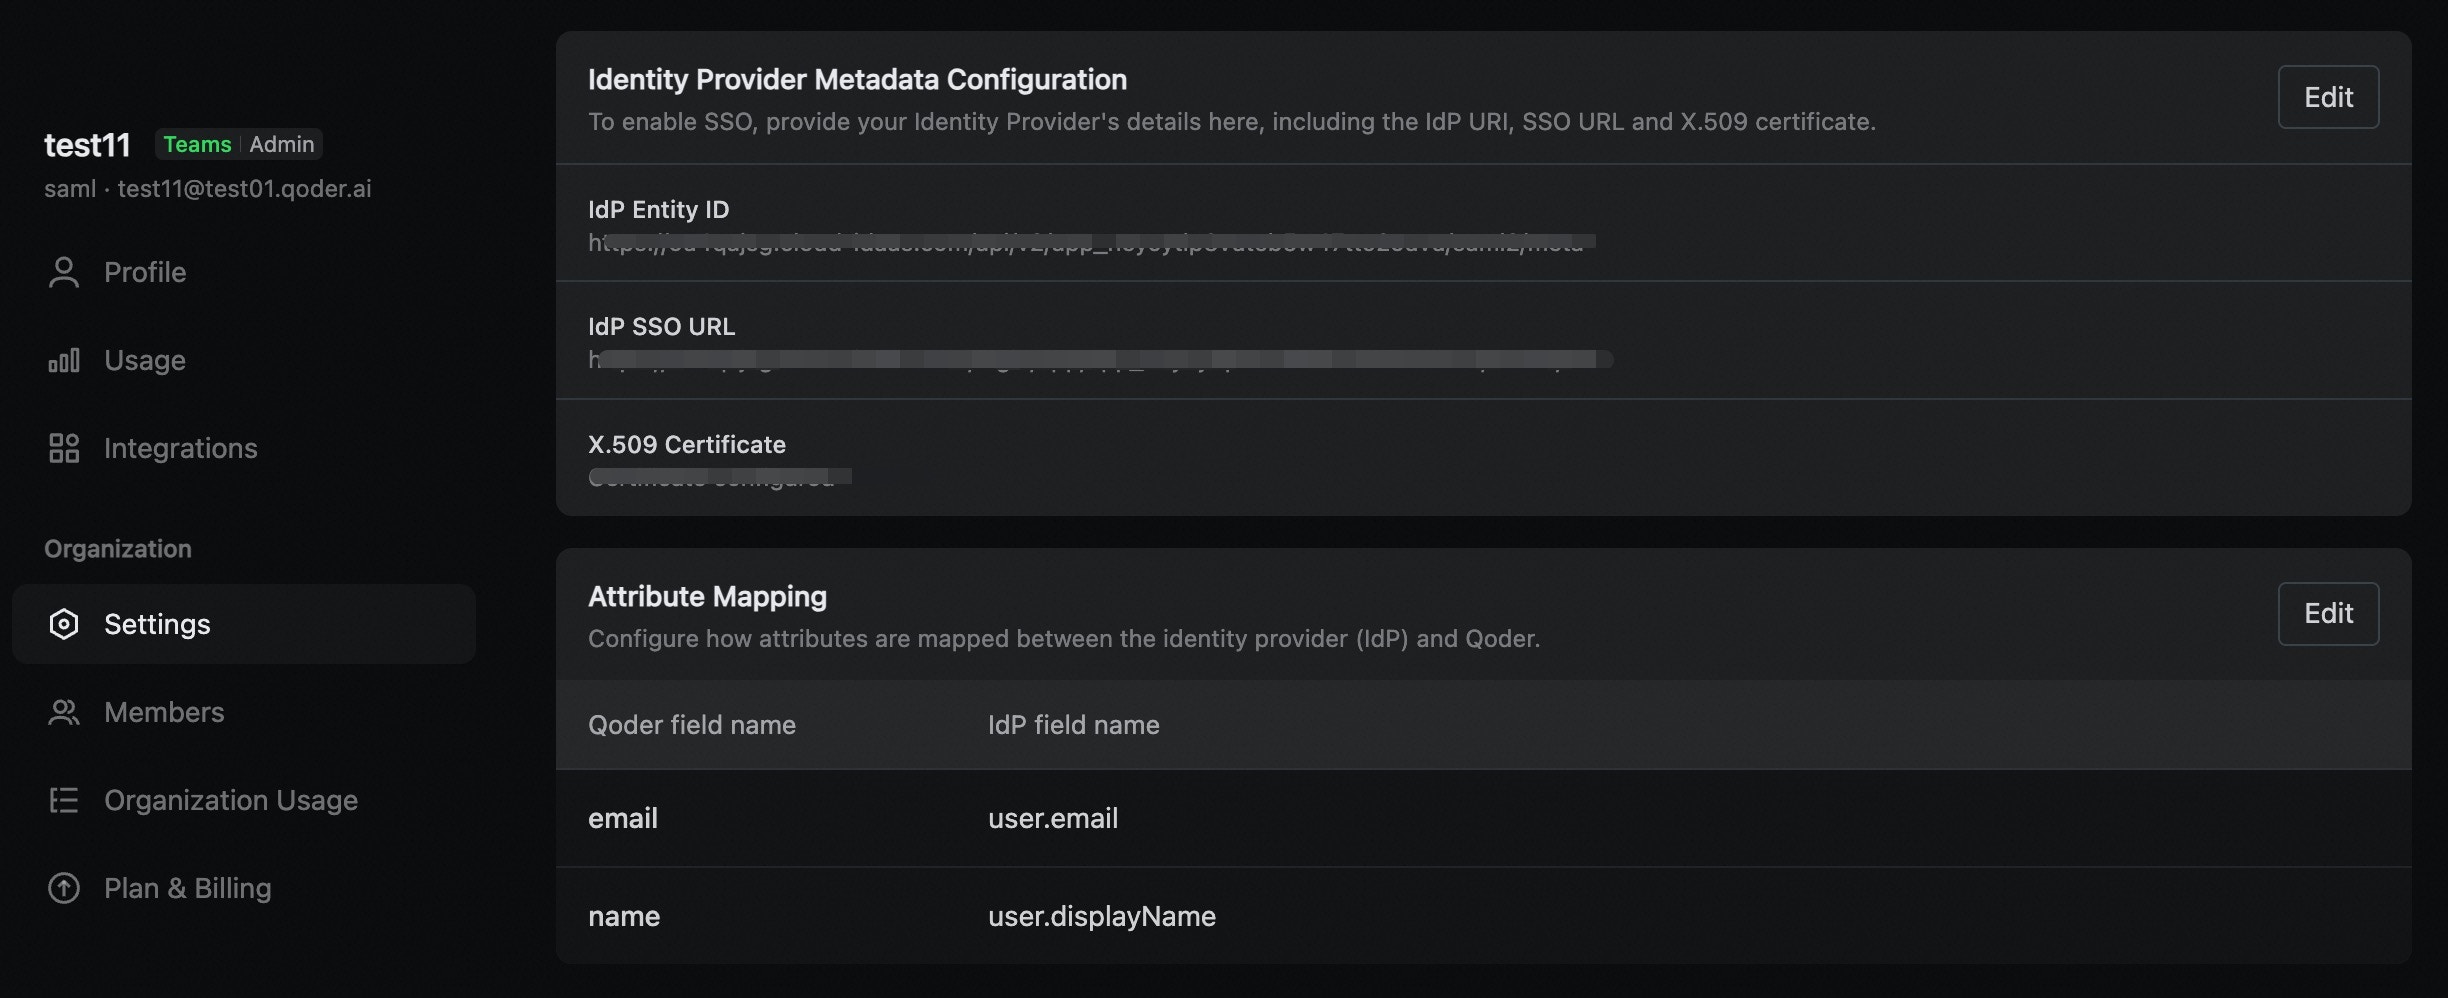
SSO supports automatic user provisioning and mapping. You need to configure how user attributes from your Identity Provider (IDP) are mapped to system fields.
1. In the **SAML Configuration** page, scroll to the **Attribute Mapping** section.
2. Configure the attribute mappings:
* **Email Attribute:** The name of the attribute from your IDP for the user's email address (e.g., `user.email`). **Required.**
* **Name Attribute:** The name of the attribute from your IDP for the user's display name (e.g., `user.name`).
3. Click **Save**.
1. In the **OIDC Configuration** page, scroll to the **Attribute Mapping** section.
2. Configure how claims returned in the OIDC UserInfo map to Qoder system fields:
* **Email Claim:** The claim name for the user's email address, usually `email`. **Required.**
* **Name Claim:** The claim name for the user's display name, usually `name` or `nickname`.
* **Open ID Claim:** The claim used as the unique user identifier, usually `sub` (or `email`).
3. Click **Save**.
**Email is required.** If the UserInfo returned by the IDP does not contain a valid email, authentication will fail. Make sure the `email` scope is granted to the Qoder application on the IDP side.
### **Step 5: Test Configuration**
Before activating, test your SSO configuration to ensure all settings are correct:
1. In the **SSO Configuration** page, click the **Test SSO** button.
2. The system will run a series of validation checks (certificates/signatures, metadata endpoint, Discovery document, attribute mapping, etc.).
3. Review the test results.
#### **Issuer URL Auto-Discovery**
If your IDP complies with the OpenID Connect Discovery specification (i.e., it exposes a `/.well-known/openid-configuration` endpoint), use this method:
1. In the **OIDC Configuration** page, select the **Issuer URL Auto-Discovery** configuration mode.
2. Fill in the following fields:
* **Issuer URL:** The issuer URL of your IDP (e.g., `https://login.company.com`, `https://oauth.aliyun.com`, `https://your-tenant.authing.cn/oidc`).
* **Client ID:** The client ID issued by your IDP for the Qoder application.
* **Client Secret:** The client secret issued by your IDP for the Qoder application.
* **Scopes** (optional): The OAuth scopes to request. `openid` is required and will be added automatically; `openid email profile` is recommended.
3. Click **Save**.
The system will automatically fetch and parse the following from `{Issuer URL}/.well-known/openid-configuration`:
* Authorization endpoint
* Token endpoint
* UserInfo endpoint
* JWKS URL (used to verify the ID Token signature)
* Supported signing algorithms
### **Step 4: Configure Attribute Mapping**
SSO supports automatic user provisioning and mapping. You need to configure how user attributes from your Identity Provider (IDP) are mapped to system fields.
1. In the **SAML Configuration** page, scroll to the **Attribute Mapping** section.
2. Configure the attribute mappings:
* **Email Attribute:** The name of the attribute from your IDP for the user's email address (e.g., `user.email`). **Required.**
* **Name Attribute:** The name of the attribute from your IDP for the user's display name (e.g., `user.name`).
3. Click **Save**.
1. In the **OIDC Configuration** page, scroll to the **Attribute Mapping** section.
2. Configure how claims returned in the OIDC UserInfo map to Qoder system fields:
* **Email Claim:** The claim name for the user's email address, usually `email`. **Required.**
* **Name Claim:** The claim name for the user's display name, usually `name` or `nickname`.
* **Open ID Claim:** The claim used as the unique user identifier, usually `sub` (or `email`).
3. Click **Save**.
**Email is required.** If the UserInfo returned by the IDP does not contain a valid email, authentication will fail. Make sure the `email` scope is granted to the Qoder application on the IDP side.
### **Step 5: Test Configuration**
Before activating, test your SSO configuration to ensure all settings are correct:
1. In the **SSO Configuration** page, click the **Test SSO** button.
2. The system will run a series of validation checks (certificates/signatures, metadata endpoint, Discovery document, attribute mapping, etc.).
3. Review the test results.
 ### **Step 6: Activate SSO**
Once testing passes, you can activate SSO:
1. In the **SSO Configuration** page, ensure all test checks have passed.
2. Click the **Enable SSO** toggle.
3. Confirm the activation in the dialog box that appears.
**After activation:**
* The SSO status will change to **Active**.
* Organization members can now log in using SAML or OIDC SSO.
* Users with verified email domains will be automatically routed to your organization's SSO login after entering their email on the login page.
**Important Recommendation:**
After activating SSO, the current administrator **should not log out immediately**. Instead, use a separate user account from a verified domain to test the SSO login and verify the configuration. This ensures that if there is an issue with the SSO setup, the administrator can still access the settings to make adjustments and avoid being locked out.
### **Step 6: Activate SSO**
Once testing passes, you can activate SSO:
1. In the **SSO Configuration** page, ensure all test checks have passed.
2. Click the **Enable SSO** toggle.
3. Confirm the activation in the dialog box that appears.
**After activation:**
* The SSO status will change to **Active**.
* Organization members can now log in using SAML or OIDC SSO.
* Users with verified email domains will be automatically routed to your organization's SSO login after entering their email on the login page.
**Important Recommendation:**
After activating SSO, the current administrator **should not log out immediately**. Instead, use a separate user account from a verified domain to test the SSO login and verify the configuration. This ensures that if there is an issue with the SSO setup, the administrator can still access the settings to make adjustments and avoid being locked out.